Running Super Mario on Kubernetes in a Proxmox Homelab
Combining retro gaming with modern Cloud-native technologies

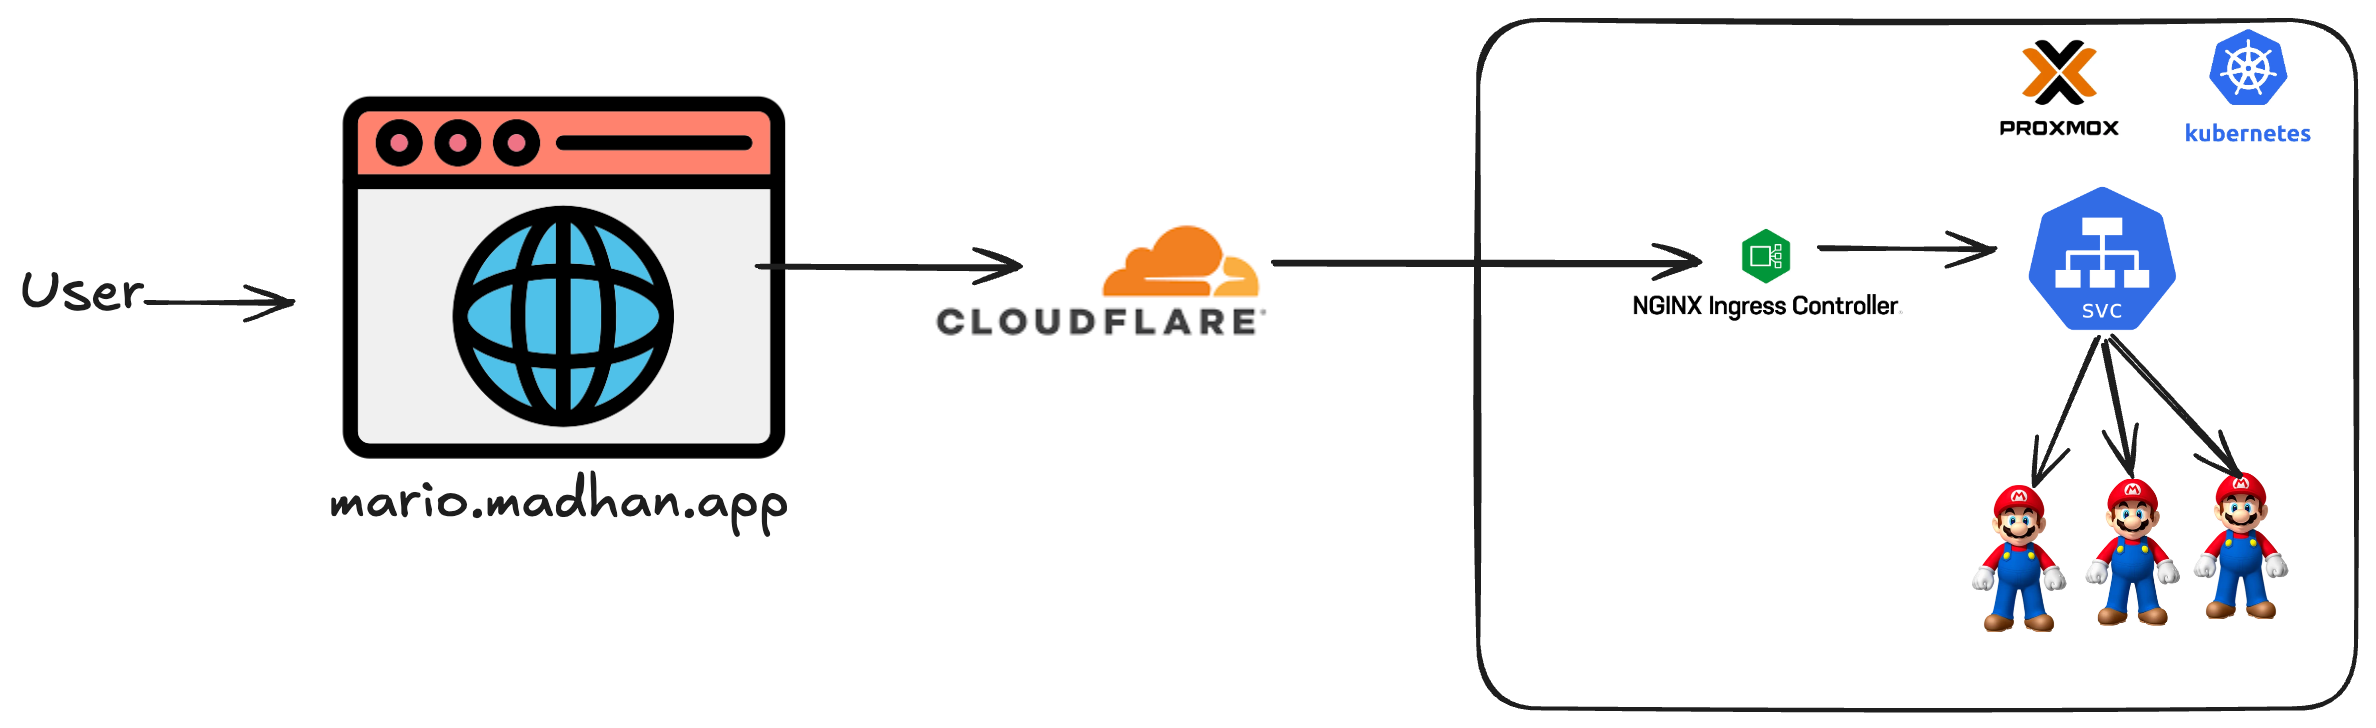
In this article, we’ll explore how to deploy the classic Super Mario game on a Kubernetes cluster running in a Proxmox homelab server. Using Nginx Ingress Controller for routing traffic, Cert Manager to automatically provision and manage TLS certificates with Let’s Encrypt, and Cloudflare for DNS services. This setup allows you to securely expose your applications to the internet with a custom domain.
Infrastructure Setup
I previously written an article, creating a Proxmox server using Pulumi. In this, I’ve made one significant change — instead of using MetalLB for load balancing, I’ve opted for kube-vip, which provides both control plane and service load balancing capabilities.
Below is the configuration for the Kubernetes cluster,
kube_version: v1.32.0
helm_enabled: true
kube_proxy_strict_arp: true

##############
### Addons ###
##############
metrics_server_enabled: true
cert_manager_enabled: true
ingress_nginx_enabled: true

### Kube-VIP
kube_vip_enabled: true
kube_vip_arp_enabled: true
kube_vip_controlplane_enabled: true
kube_vip_services_enabled: true
kube_vip_address: "192.168.1.200"
# kube_vip_interface: "{% if has_gpu | default(false) %}ens18{% else %}enp6s18{% endif %}"
kube_vip_interface: ens18
kube_vip_address_range: 192.168.1.201-192.168.1.210

loadbalancer_apiserver:
    address: "{{ kube_vip_address }}"
    port: 6443
The main benefit of using kube-vip is that we get load balancing for both the control plane and services in a single solution. When configuring kube-vip, it’s critical to provide unused IP addresses in the address range. You can identify available IPs in your home network using the NMAP
nmap -sn 192.168.1.0/24
After building the infrastructure with Pulumi and setting up Kubernetes with Kubespray, it is time to deploy Super Mario.
Deploying Super Mario
For Super Mario deployment, we’ll be using kustomize with Horizontal Pod Autoscaler (HPA) and a ClusterIP service. The Kubernetes manifests for this application include:
-
A Deployment resource that runs the Super Mario container
-
A Service resource that exposes the game on port 8080
-
An HPA to automatically scale based on CPU utilization
Once the deployment is complete, you can test the application locally using port forwarding.
kubectl port-forward -n mario-game mario-deployment-56c444b9b6-5xk2j 8080:8080
Navigate to localhost:8080 in your browser to verify the game is running correctly.
Installing Nginx Ingress Controller
The Nginx Ingress Controller acts as a reverse proxy and load balancer for the Kubernetes services. It will route external traffic to Super Mario game. It can be installed using Helm.
helm repo add ingress-nginx https://kubernetes.github.io/ingress-nginx
helm repo update
helm install nginx-ingress ingress-nginx/ingress-nginx \
    --namespace nginx-ingress-system --create-namespace \
    --version 4.12.0 \
    --set controller.service.loadBalancerIP=192.168.1.205
Note: we’re setting the loadBalancerIP to an address within our kube-vip address range.
Setting Up DNS with Cloudflare
To make Super Mario game accessible via a custom domain, need to create a DNS record pointing to our Nginx Ingress Controller’s IP address.

-
Log into your Cloudflare dashboard
-
Navigate to the DNS management section for your domain
-
Create an A record (e.g., mario.yourdomain.com) pointing to 192.168.1.205
-
Ensure the “Proxy status” is turned OFF (use DNS only mode)
This direct DNS mapping is essential because we’re running in a homelab environment.
Creating a Cloudflare API Token
For Let’s Encrypt to automatically verify domain ownership and issue certificates, we need to create a Cloudflare API token.
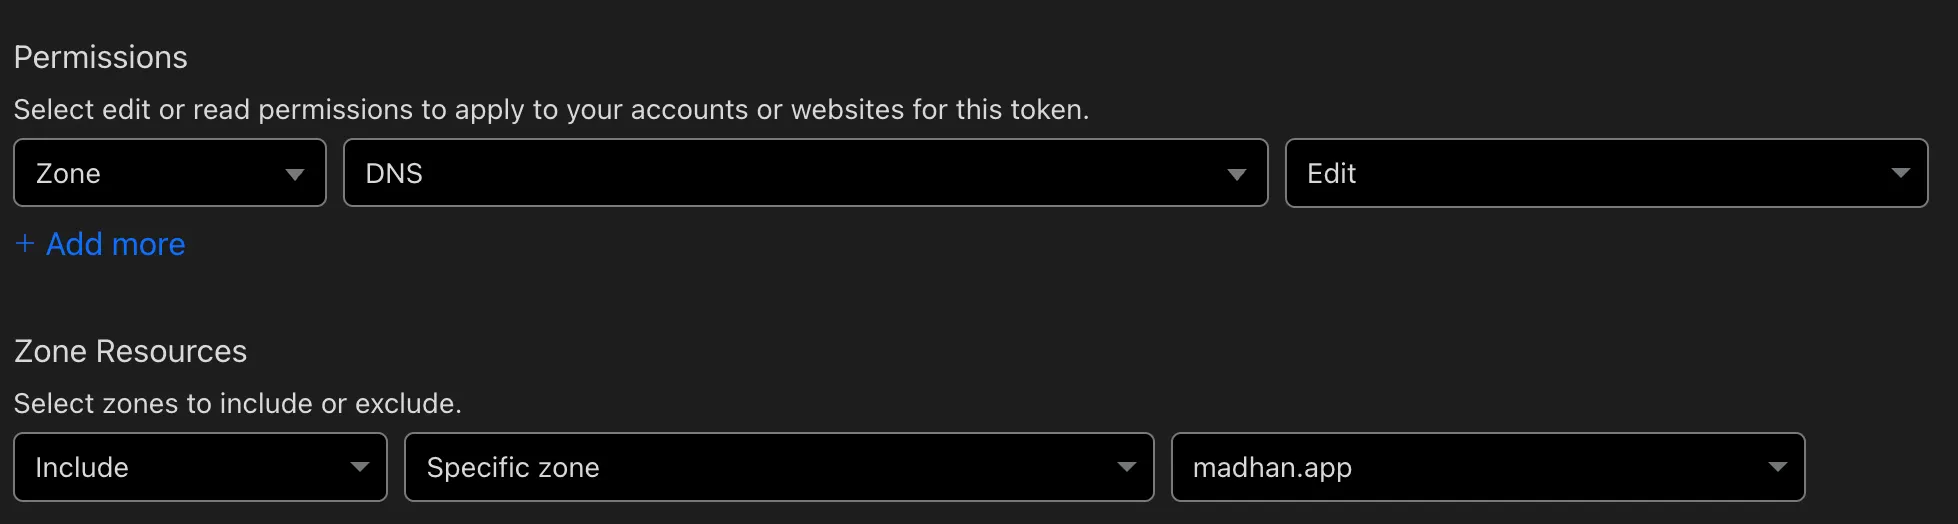
-
Log into your Cloudflare dashboard
-
Navigate to “My Profile” > “API Tokens”
-
Click on “Create Token”
-
Select the “Edit zone DNS” template
-
Ensure “Zone” > “DNS” > “Edit” permission is included
-
Specify your domain in the “Zone Resources” section
-
Click “Continue to summary” and then “Create Token”
-
Copy and securely store the token that appears — it will only be shown once
Configuring Certificate Management
Let’s Encrypt provides free TLS certificates that can be used to secure the Super Mario game. First, create a Kubernetes secret with your Cloudflare API token.
kubectl create secret generic cloudflare-api-token-secret \
    --namespace cert-manager \
    --from-literal=api-token=<CLOUDFLARE_API_TOKEN>
Next, create a ClusterIssuer to handle certificate provisioning. We’ll use the DNS-01 challenge since our homelab isn’t directly accessible from the internet (which would be required for HTTP-01 challenges).
apiVersion: cert-manager.io/v1
kind: ClusterIssuer
metadata:
    name: letsencrypt-prod
    namespace: cert-manager
spec:
    acme:
    server: https://acme-v02.api.letsencrypt.org/directory
    privateKeySecretRef:
        name: letsencrypt-prod
    # Enable the DNS-01 challenge provider
    solvers:
    - dns01:
        cloudflare:
            # Reference to the Kubernetes secret containing the Cloudflare API token
            apiTokenSecretRef:
            name: cloudflare-api-token-secret
            key: api-token
Exposing Super Mario with Ingress
Finally, create an Ingress resource to expose the Super Mario game to the internet with TLS encryption.
apiVersion: networking.k8s.io/v1
kind: Ingress
metadata:
    name: mario-ingress
    namespace: mario-game
    annotations:
    cert-manager.io/cluster-issuer: "letsencrypt-prod"
spec:
    ingressClassName: nginx
    tls:
    - hosts:
    - mario.madhan.app
    secretName: mario-tls
    rules:
    - host: mario.madhan.app
        http:
        paths:
            - pathType: Prefix
            path: "/"
            backend:
                service:
                name: mario-service
                port:
                    number: 8080
Verifying the Deployment
After applying all configurations, you should be able to access your Super Mario game securely via your custom domain (e.g., https://mario.yourdomain.com). You can verify the certificate status with:
kubectl get certificate -n mario-game
The status should show “Ready” once Let’s Encrypt has issued the certificate.
Troubleshooting
If you encounter issues, check the following:
-
Ensure your Cloudflare API token has the correct permissions
-
Verify that the DNS record is properly configured in Cloudflare
-
Check the cert-manager logs for any errors
kubectl logs -n cert-manager -l app=cert-manager -
Confirm that your Ingress Controller is properly receiving traffic
kubectl logs -n nginx-ingress-system -l app.kubernetes.io/component=controller
Originally published on Medium
🌟 🌟 🌟 The source code for this blog post can be found here 🌟🌟🌟
Reference:
[1] https://www.youtube.com/watch?v=MpovOI5eK58&t=2679s
[2] https://github.com/kubernetes/ingress-nginx